Installing NixOS
RAID setup
Enable JBOD mode if supported. Otherwise, set up a hardware RAID 1 if there are two disks designated for boot. If there are more than two disks which should be used then put each one in its own RAID 0 array (so a RAID 0 for each disk).
Netboot
- Follow the guide in the nix-configs repo under hosts/netbootos/README.md to build and deploy an updated NixOS image to the netbooter on Zeus.
- Check that the NICs are configured to PXE boot in the main BIOS. On the Dells,
this is shown as
Enabled with PXEin the NIC configuration section. - On some hosts, you may also need to go into the network config menu during boot (ctrl+S) and configure VLAN 3 on the NICs you want to boot from.
Partitioning
These partitioning instructions work for both UEFI and BIOS boots. Regardless of which one you are targeting, you should use exactly the same structure as shown here.
export DISK=/dev/sdwhatever
parted $DISK mklabel gpt
cgdisk $DISK
... continued below
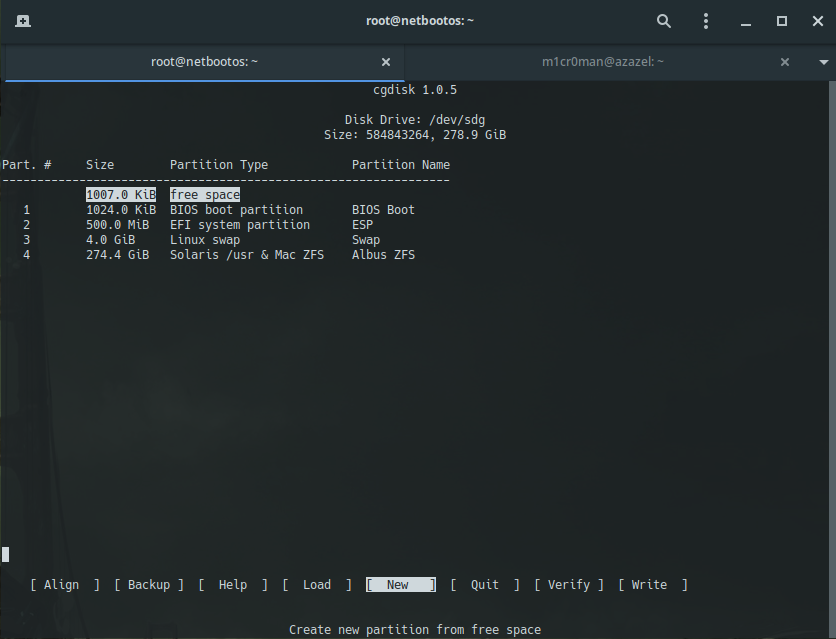
CGDisk instructions:
Always choose the default first sector.
- First partition: Size 1M, type ef02, name BIOS boot
- Second partition: Size 500M, type ef00, name ESP
- Third partition: Size 4G, type 8200, name Swap
- Fourth partition: Size default/max, type bf01, name $HOSTNAME ZFS
- Write and close
Now back to console...
mkfs.fat -F32 -n ESP ${DISK}2
mkswap -L Swap ${DISK}3
export HOSTNAME=newhostname
# Find the partuuid for ${DISK}4
export PARTUUID="$(lsblk -o PATH,PARTUUID | grep ${DISK}4 | awk '{print $2}')"
zpool create \
        -O compress=zstd \
        -O checksum=skein \
        -O dedup=off \
        -O acltype=posixacl \
        -O xattr=sa \
        -O dnodesize=2k \
        -O mountpoint=none \
        -o failmode=continue \
        -o autoexpand=on \
        -o comment="$HOSTNAME ZFS" \
        -o ashift=12 \
        zbackup /dev/disk/by-partuuid/$PARTUUID
zfs create -o mountpoint=legacy zroot/nixos
zfs create -o mountpoint=legacy -o atime=off zroot/nixos/store
You might be asking, why a ZFS root? Well, it avoids the need for LVM or mdadm at any point. It is easier to configure disk mirrors if there is no underlying RAID controller. The compression benefits cost nothing and are nice to have. Snapshotting is also very useful for backups and messing around with the system.
Reasoning behind each property:
compress=zstd: Use ZSTD compressionchecksum=skein: Use a faster (aka less CPU demanding) checksum algorithmdedup=off: Dedup has no benefit in most cases, and costs a lot of RAM to run.xattr=sadnodesize=2k: Enable extended attributes and a larger space to store them.faimode=continue: Keep reading if possible if there is a disk failureautoexpand=on: If the disks are replaced, grow to the maximum size. U.ashift=12: 4kib sector alignment for compatibility with SSDs and HDDs.
Configuring and Installation
swapon ${DISK}3
mount -t zfs zroot/nixos /mnt
mkdir /mnt/{boot,nix}
mount -t zfs zroot/nixos/store /mnt/nix
mount ${DISK}2 /mnt/boot
nixos-generate-config --root /mnt
cd /mnt/etc/nixos
mv * ~/
git clone https://github.com/redbrick/nix-configs.git .
mkdir hosts/$HOSTNAME
mv ~/hardware-configuration.nix hosts/$HOSTNAME/
cp hosts/metharme/configuration.nix hosts/$HOSTNAME/
ln -s hosts/$HOSTNAME/configuration.nix .
At this point, you must edit the configuration.nix to suit this host.
- Add/remove imported services
- Change the IP address and hostname
- Update the bond config interfaces
- Update boot.loader.grub.devices
- Generate a new networking.hostId with
head -c4 /dev/urandom | od -A none -t x4 - Set the
system.stateVersionto the latest version
Once that's complete, run nixos-install and wait for it to finish.
You will be prompted for a root password at the end.
Record it in the password safe.
After installation, you MUST unmount the filesystems gracefully. In particular,
if you do not run zpool export then the system will fail to boot.
umount /mnt/{nix,boot,}
swapoff ${DISK}3
zpool export zroot
After checking the booted system, commit the new configuration files to nix-configs.